Have you ever gazed upon a vibrant hibiscus flower and wished you could capture its breathtaking beauty on paper? The desire to learn how to draw a hibiscus flower is a common one, fueled by the sheer elegance and striking colors of these magnificent blooms. Whether you've been searching for "hibiscus flower drawing," "easy hibiscus drawing," or "hibiscus flower drawing easy," you've landed in the perfect spot to embark on your artistic journey. This comprehensive guide is designed to empower beginners and seasoned artists alike, providing you with the insights, techniques, and inspiration needed to bring the delicate allure of the hibiscus to life through your art. Prepare to dive into an easy drawing guide, packed with tips and techniques to help you bring the vibrant beauty of a hibiscus to life on paper.
Hibiscus are showy, ornamental, brightly colored flowers that captivate with their large, often trumpet-shaped blooms. Most are tropical, but some can survive mild temperate winters, making them a beloved sight in diverse gardens worldwide. They are treasured by gardeners, not only because of their large, colorful blooms, but also because they attract hummingbirds and butterflies, adding dynamic life to any landscape. Learning to draw flowers, especially one as iconic as the hibiscus, is perfect for various creative outlets, from enhancing bullet journals to creating standalone artworks. This tutorial is specifically designed for beginners because I feel passionate about sharing my joy for drawing and believe everyone can discover the therapeutic and rewarding experience of putting pencil to paper.
Table of Contents
- The Allure of Hibiscus: Why Draw Them?
- Understanding Hibiscus Anatomy: The Foundation of Your Drawing
- Getting Started: Essential Tools for Your Hibiscus Drawing Journey
- Step-by-Step Guide: How to Draw a Hibiscus Flower (Beginner-Friendly)
- Beyond the Basics: Exploring Styles and Colors in Your Hibiscus Art
- Practice Makes Perfect: Sketching Exercises and Learning Resources
- The Joy of Drawing Flowers: From Bullet Journals to Fine Art
- Conclusion: Your Artistic Journey with Hibiscus
The Allure of Hibiscus: Why Draw Them?
One day, I decided I wanted to learn how to draw flowers, specifically hibiscus flowers. Hibiscus are beautiful, and their big, colorful petals always caught my eye. There's something inherently captivating about their structure, their vibrant hues, and the way they seem to unfurl with such grace. For artists, the hibiscus presents a fantastic subject because of its distinct form and the opportunity it offers to play with color and light. Its large petals provide ample space for shading and detailing, while the prominent stamen offers a unique focal point. Beyond their aesthetic appeal, hibiscus flowers hold cultural significance in various parts of the world, symbolizing beauty, passion, and even hospitality. Capturing this essence in a hibiscus flower drawing allows you to connect with both nature and diverse cultural narratives, enriching your artistic expression.
Understanding Hibiscus Anatomy: The Foundation of Your Drawing
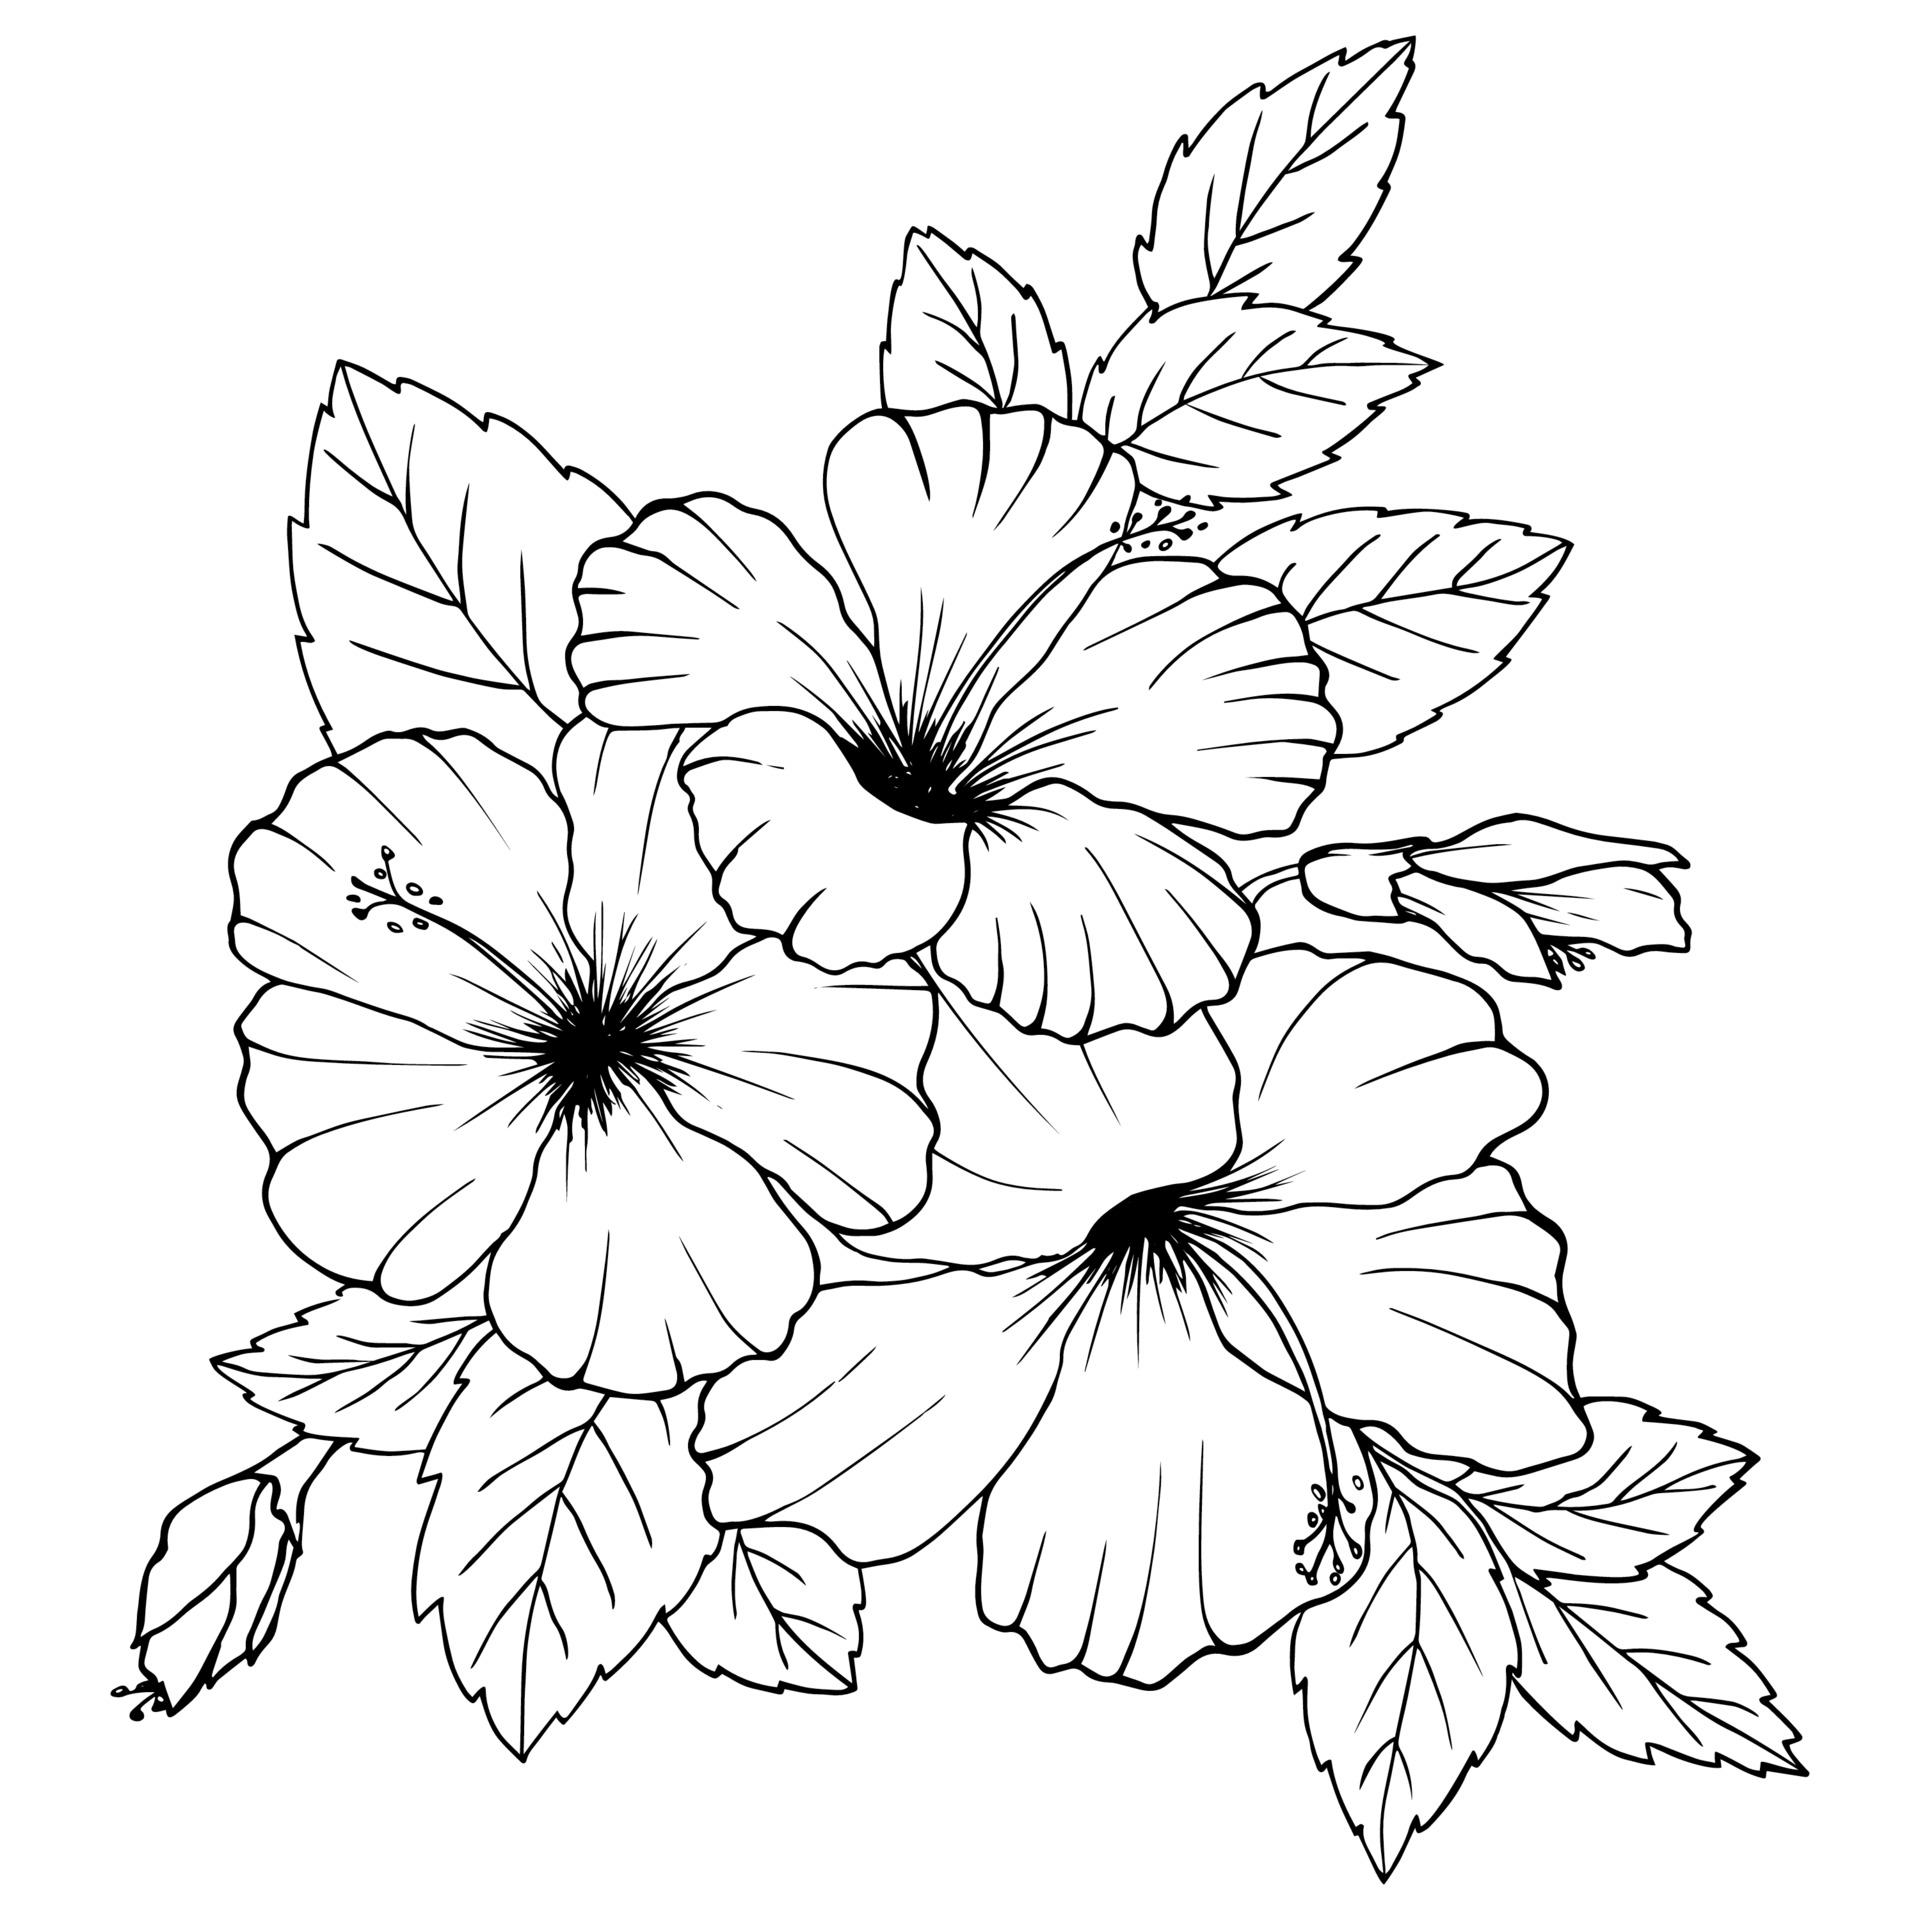
Before drawing the hibiscus in different styles, it helps to understand its basic structure. Just as an architect understands the blueprint of a building, an artist benefits immensely from understanding the anatomy of their subject. This foundational knowledge will not only make your "hibiscus flower drawing" more accurate but also more believable and dynamic. Knowing where each part sits and how it connects will allow you to draw with confidence, even when attempting more complex angles or stylized interpretations. This understanding is key to creating a realistic petal shape, subtle curves, and precise internal details, including accurate petal veins and a distinct stamen structure.
Key Parts: Petals, Sepals, Stamen
Let's break down the key components of a hibiscus flower:
- Petals: Usually five broad petals that slightly overlap. These are the most striking feature, often with ruffled edges or gentle curves. Pay attention to how they overlap and how light might fall across their surfaces. The way these petals unfurl and present themselves is central to a compelling hibiscus drawing.
- Sepals: Green outer petals that support the bloom. These are typically smaller and greener, forming a cup-like structure at the base of the flower, cradling the developing bud and supporting the open bloom. While less showy, they are crucial for structural integrity in your drawing.
- Stamen: This is arguably the most distinctive feature of a hibiscus. It's a thin stalk that holds pollen, often extending prominently from the center of the flower. At the end of this stalk, you'll find smaller, pollen-bearing structures (anthers) and sometimes a stigma, which can be branched or lobed. The stamen can be drawn with two curved lines running close to one another, giving it a cylindrical appearance, with small dots or ovals for the anthers. This central element adds significant character and detail to your hibiscus flower drawing.
By internalizing these basic parts, you'll be better equipped to tackle the complexities of form and proportion, ensuring your hibiscus drawing is both beautiful and botanically accurate.
Getting Started: Essential Tools for Your Hibiscus Drawing Journey
You don't need a vast array of expensive art supplies to begin your hibiscus flower drawing journey. Often, simplicity is key, especially for beginners. Here's what you'll typically need:
- Pencils: A range of graphite pencils is ideal. A 3H pencil is excellent for light sketches and initial outlines, as its light mark can be easily erased. B-grade pencils (like 2B, 4B, 6B) are great for darker lines, shading, and adding depth.
- Eraser: A good quality kneaded eraser or a vinyl eraser will be invaluable for corrections and lifting graphite.
- Paper: Standard drawing paper or even a simple sketch pad will suffice. Look for paper with a bit of tooth (texture) to hold graphite well.
- Reference Images: Pictures of real hibiscus flowers are your best guide. You can find and save ideas about hibiscus flower drawing on Pinterest, or simply use photos from your garden or online image searches. Having a clear visual reference is crucial for understanding shapes, overlaps, and details.
- Optional: Markers or Colored Pencils: Once you're comfortable with the outlines, you might want to explore adding color. Markers can provide vibrant, bold hues, while colored pencils allow for more subtle blending and layering.
Remember, the goal is to start. Don't let the lack of "perfect" tools deter you. Many beautiful hibiscus drawings begin with just a pencil and paper.
Step-by-Step Guide: How to Draw a Hibiscus Flower (Beginner-Friendly)
In this tutorial, I will guide you through a beginner-friendly approach to draw a hibiscus flower. This simple step-by-step illustrated guide will walk you through every stage of the process. It's designed to build your confidence and skills progressively. I started with simple sketches, trying to capture the basic shape of the hibiscus flower. It wasn't easy at first, but I kept practicing, using pictures of hibiscus flowers as my guide. Slowly, I began to understand how the petals formed, and you will too.
Phase 1: Laying the Foundation with Basic Shapes
The session kicks off with a fun introduction to hibiscus flowers, highlighting their cool features and significance. Now, let's get into the drawing itself.
- Draw a Rectangle: Start with a super light sketch using a 3H pencil—think of it like setting the stage. Draw a rectangle that will define the proportional boundaries of your chosen drawing. This acts as a guide, ensuring your flower doesn't end up too wide or too tall.
- Divide the Shape: From the middle of the rectangle, draw one vertical and one horizontal line, equally dividing the shape. These lines will help you center your flower and establish its overall symmetry.
- Sketch the General Curved Lines: I start my hibiscus flower drawing by sketching out the general curved lines that the flower heads will fit into. Think of a large, soft "U" shape or a slightly tilted oval for the main body of the flower. This initial light sketch with main parts is crucial for getting the overall form right before you commit to details.
This method of drawing a hibiscus flower is noticeably more detailed than some simpler tutorials, focusing clearly on realistic petal shapes and subtle curves, even at this early stage. The lighter your initial lines, the easier they are to erase or adjust later.
Phase 2: Refining Petals and Adding Details
Once you have sketched the light general shapes of the hibiscus flowers, then you can start going over the petals, stem, and leaves again and making changes and alterations to your shapes in order to get them just right.
- Outline the Petals: Begin to outline the five broad petals, remembering that they slightly overlap. Observe your reference image closely. Do the petals curl? Are their edges smooth or slightly ruffled? Pay attention to the negative space between the petals as much as the petals themselves. This helps define their individual forms. Each petal should feel like it has volume and is curving away from or towards you.
- Add the Sepals and Stem: At the base of the flower, lightly sketch the green outer petals (sepals) that support the bloom. Then, draw the stem extending downwards. The stem should be proportional to the flower's size.
Defining form once you have sketched the light general shapes of the hibiscus flowers, then you can start going over the petals, stem, and leaves again and making changes and alterations to your shapes in order to get a more refined and accurate representation. Don't be afraid to use your eraser to tweak shapes until they feel right.
Phase 3: The Distinct Stamen and Finishing Touches
This is where your hibiscus drawing truly comes to life, adding the unique characteristics that make it instantly recognizable.
- Draw the Stamen: In this second part of your hibiscus drawing, we will be adding not only another petal onto the flower, but also the stamen poking out from the center of the flower. The stamen is a thin stalk that holds pollen, and it can be drawn with two curved lines running close to one another. At the end of this stalk, add the small, round anthers where the pollen is held. Some hibiscus also have a branched stigma at the very tip of the stamen; observe your reference to see if you need to include this. This step is crucial for giving your hibiscus flower drawing its distinct character.
- Add Petal Veins and Texture: Using a lighter pencil (or less pressure), draw subtle lines radiating from the base of each petal outwards. These are the petal veins, which add a layer of realism and texture. Observe how these veins might curve or branch in your reference photo.
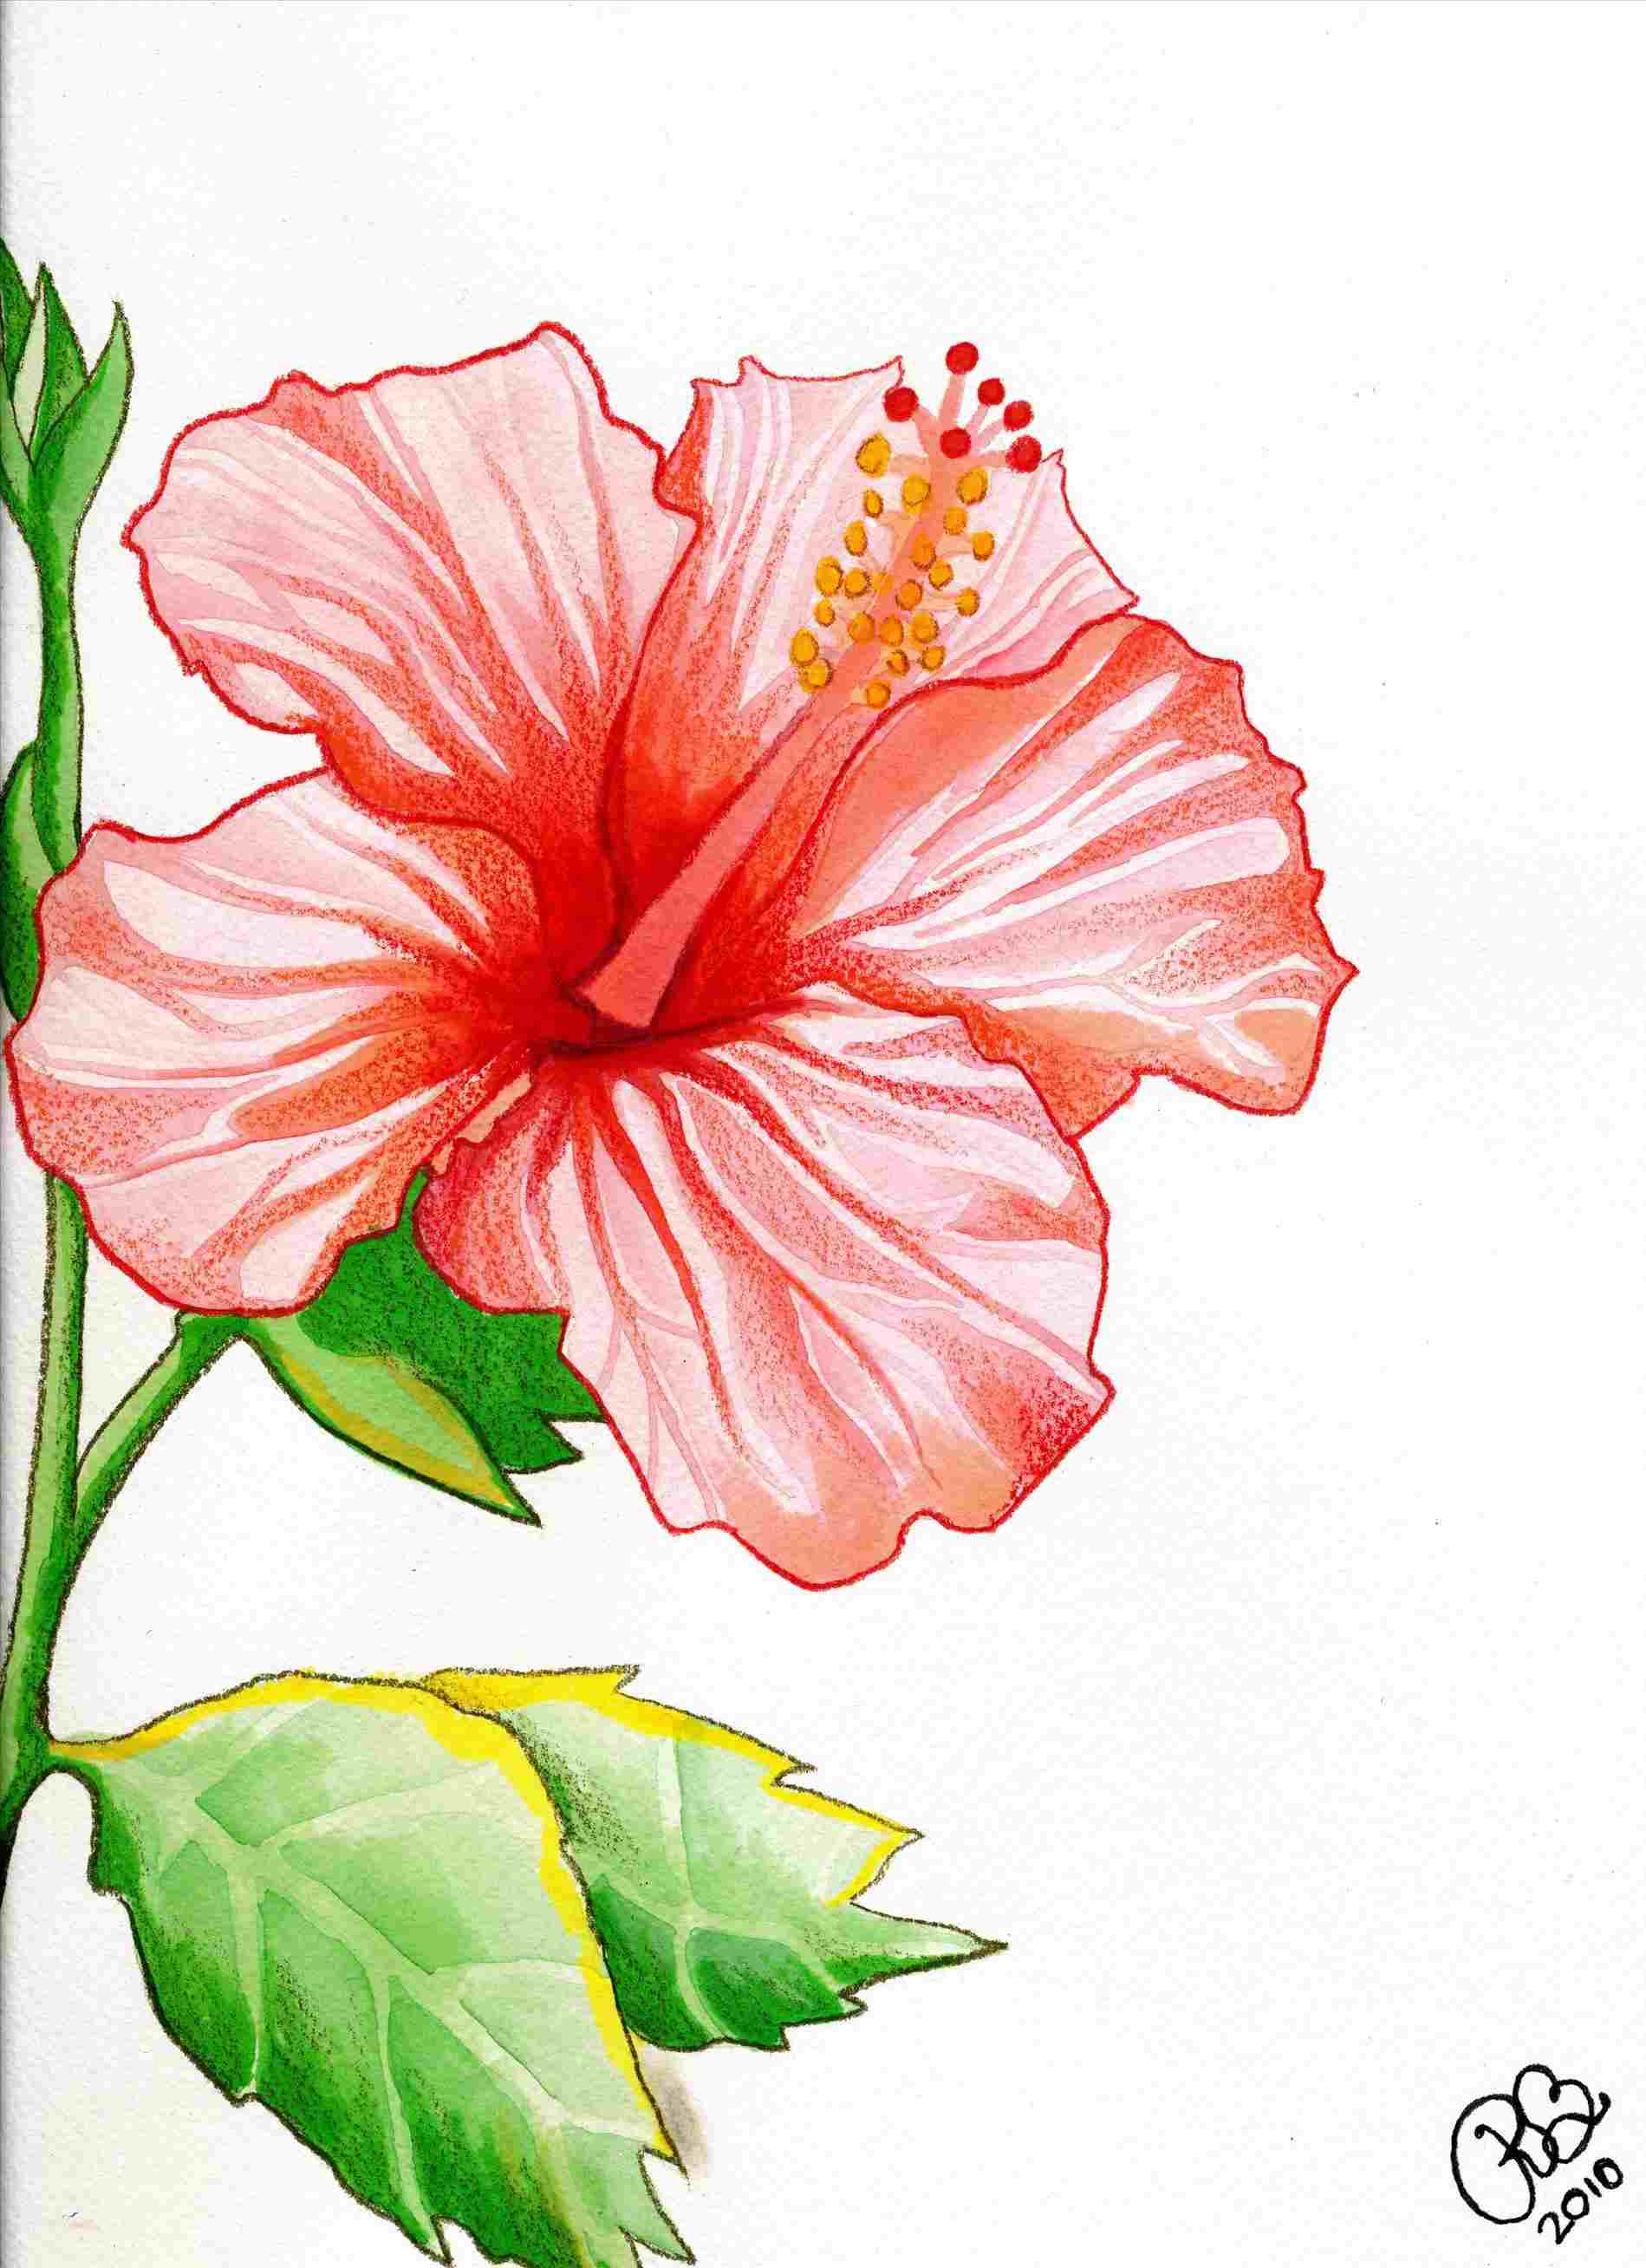
- Shading and Detailing: Now, you can start adding shading to give your hibiscus drawing depth and dimension. Think about where the light source is coming from and shade the areas that would be in shadow. The subtle curves of the petals will cast soft shadows on each other. You can also add more precise internal details, including accurate petal veins and the distinct stamen structure. If you're using markers or colored pencils, this is where you'd begin layering colors, building up vibrancy and depth.
Congratulations! You've just completed a detailed hibiscus flower drawing. Remember, practice is key. The more you draw, the better you'll become at capturing the nuances of these beautiful flowers.
Beyond the Basics: Exploring Styles and Colors in Your Hibiscus Art
Once you've mastered the fundamental steps of a realistic hibiscus flower drawing, the world of artistic expression opens up. You can watch a video, do sketching exercises, and explore different styles and colors for your artwork. Don't feel confined to just one approach.
- Stylized vs. Realistic: While this guide focuses on a more detailed, realistic approach, you can experiment with stylized hibiscus drawings. This might involve simplifying shapes, using bold outlines, or even abstracting the flower's form. Think about how a hibiscus might look in a tattoo design, a graphic novel, or a minimalist illustration.
- Color Exploration: Hibiscus flowers come in an incredible array of colors: vibrant reds, sunny yellows, soft pinks, pure whites, and even multi-colored varieties. Experiment with different mediums like watercolors for a delicate, translucent effect, acrylics for bold, opaque colors, or pastels for soft, blended hues. Consider the color theory – how do complementary colors make the hibiscus pop? How does light affect the color saturation?
- Composition: Don't just draw a single flower in the middle of the page. Think about composition. Should it be a close-up? Part of a larger botanical arrangement? A branch with multiple blooms and leaves? See more ideas about flower drawing, hibiscus flower drawing, hibiscus, and how they are composed by other artists.
Exploring these variations will not only enhance your "hibiscus drawing" skills but also help you develop your unique artistic voice.
Practice Makes Perfect: Sketching Exercises and Learning Resources
The journey of learning to draw is continuous, and consistent practice is the most effective way to improve. Here are some ways to keep honing your hibiscus flower drawing skills:
- Timed Sketches: Set a timer for 5 or 10 minutes and try to capture the essence of a hibiscus flower. Don't worry about perfection; focus on getting the main shapes and proportions down quickly. This helps loosen up your hand and eye.
- Focus on Individual Parts: Dedicate a session to just drawing petals, another to just the stamen, and another to leaves. This deep dive into individual components will strengthen your understanding of their forms and textures.
- Different Angles: Try drawing hibiscus from various angles – looking down into the bloom, from the side, or even from behind. This challenges your spatial reasoning and ability to render three-dimensional forms.
- Online Resources: There are countless online resources available. You can watch a video tutorial on how to draw a hibiscus flower with easy steps, outlines, and markers. Many artists share their processes, offering different perspectives and techniques. For the first time, you might even find exclusive photos and illustrations to use as reference.
- Art Communities: Find and save ideas about hibiscus flower drawing on Pinterest, Instagram, or other art-sharing platforms. Engaging with other artists and seeing their work can provide endless inspiration and constructive feedback.
Remember, every line you draw, every sketch you make, is a step forward in your artistic development. Embrace the process, and enjoy the journey.
The Joy of Drawing Flowers: From Bullet Journals to Fine Art
Learning to draw flowers, especially something as captivating as a hibiscus, offers a multitude of personal and creative benefits. For many, it's a form of mindfulness, a way to slow down and observe the intricate details of nature. The act of drawing can be incredibly therapeutic, providing a calming escape from daily stresses. Beyond personal enjoyment, your "hibiscus flower drawing" can find a place in various applications.
- Bullet Journals and Planners: As mentioned, learning to draw flowers is perfect for bullet journals. Adding a small, hand-drawn hibiscus can personalize your pages, making them more aesthetically pleasing and inspiring. It's a simple way to infuse creativity into your daily planning.
- Greeting Cards and Gifts: A hand-drawn hibiscus on a card or as part of a personalized gift adds a unique and heartfelt touch that store-bought items simply can't replicate.
- Home Decor: Your finished hibiscus drawings, especially if you move into color, can be framed and displayed as beautiful wall art, bringing a touch of nature's elegance indoors.
- Digital Art and Design: The skills learned in traditional drawing translate well into digital art. You can scan your sketches and use them as a basis for digital paintings, illustrations, or even patterns for fabric or stationery design.
The versatility of flower drawing means your skills can be applied in countless ways, turning a simple hobby into a source of personal satisfaction and even a creative side hustle.
Conclusion: Your Artistic Journey with Hibiscus
We've journeyed through the enchanting world of the hibiscus, from understanding its anatomy to mastering the step-by-step process of creating a compelling hibiscus flower drawing. We’ve covered everything from laying down initial guidelines with a rectangle to meticulously detailing the stamen and adding realistic petal veins. Remember, the key to success lies in understanding the basic structure, practicing consistently, and allowing yourself to explore different styles and colors. Whether you're a complete novice or looking to refine your skills, the vibrant beauty of the hibiscus offers an endless source of inspiration.
Now that you're equipped with this comprehensive guide, it's your turn to pick up a pencil and bring these magnificent blooms to life. Don't be afraid to experiment, make mistakes, and learn from every stroke. Your artistic journey with the hibiscus is just beginning. What was your favorite part of this tutorial? Share your thoughts and your own hibiscus flower drawings in the comments below, or explore more of our drawing guides to continue expanding your creative horizons!