Embarking on the journey of cupcake drawing opens up a delightful world where creativity meets confectionery. Whether you're a budding artist, a parent looking for engaging activities for your kids, or simply someone seeking a relaxing and rewarding hobby, learning how to draw a cupcake offers a surprisingly versatile and fun artistic outlet. These miniature desserts, with their charming shapes and endless decorative possibilities, are not just treats for the palate but also perfect muses for your sketchbook.
From the delicate fluted cup to the luscious swirl of frosting and the playful scattering of sprinkles, every element of a cupcake presents an opportunity for artistic expression. This comprehensive guide will walk you through the sweet art of drawing cupcakes, providing step-by-step instructions, creative tips, and inspiration to help you create your own mouth-watering masterpieces on paper. Get ready to transform simple lines into delectable designs!
Table of Contents
- The Charm of Cupcake Drawing: Why This Sweet Subject?
- Essential Tools for Your Cupcake Drawing Adventure
- The Anatomy of a Cupcake Drawing: Breaking It Down
- Mastering the Frosting: Swirls and Drips
- Adding the Details: Sprinkles, Strawberries, and Cherries
- Coloring Your Tasty Treat: Bringing Life to Your Cupcake Drawing
- Creative Applications and Inspiration for Your Cupcake Art
- Fostering Creativity: The Benefits of Cupcake Drawing
The Charm of Cupcake Drawing: Why This Sweet Subject?
Cupcakes, those delightful miniature desserts, embody a world of sweetness and creativity. Their origins can be traced back to the 19th century in the United States, where they evolved from traditional cake recipes, offering a single-serving treat that quickly gained popularity. Beyond their culinary appeal, cupcakes hold a unique charm as an artistic subject. They are inherently joyful, visually appealing, and offer endless possibilities for customization, making them an ideal subject for artists of all ages and skill levels. For beginners, learning how to draw a cupcake provides a perfect entry point into the world of art. The basic shapes are relatively simple, yet there's ample room to experiment with textures, shading, and vibrant colors. Kids and beginners alike can now draw a great looking cupcake with confidence, building fundamental drawing skills without feeling overwhelmed. It's a subject that allows for immediate gratification, as even a simple outline can clearly convey the essence of this beloved dessert. The process of cupcake drawing is not just about replicating an image; it's about capturing a feeling of sweetness and fun on paper.Essential Tools for Your Cupcake Drawing Adventure
Before you dive into the delicious world of cupcake drawing, gathering the right tools will set you up for success. You don't need an elaborate art studio; simple supplies are often the best starting point, especially for kids and beginners. Here’s what you’ll need: * **Pencils:** A standard graphite pencil (HB or 2B is great for sketching) and an eraser are fundamental. You might also consider a lighter pencil (2H) for initial guidelines and a darker one (4B or 6B) for shading and definition. * **Paper:** Any drawing paper will do, but a slightly heavier paper (like sketch paper or mixed-media paper) can handle more erasing and coloring without tearing. Some artists even enjoy drawing on trading card size paper (2.5″ x 3.5″) for miniature art, which can then be placed in a trading card sleeve. * **Coloring Mediums:** This is where your tasty treat truly comes to life! You can color in your tasty treat with markers, crayons, or pencils. Each medium offers a different texture and vibrancy: * **Markers:** Provide bold, vibrant colors. * **Crayons:** Offer a classic, waxy texture, great for younger artists. * **Colored Pencils:** Allow for layering, blending, and detailed shading, perfect for achieving realistic textures. * **Optional:** A ruler for straight lines (though freehand is often preferred for organic shapes), and a blending stump or cotton swab if you're working with colored pencils and want to achieve smooth gradients. Having these tools ready will ensure a smooth and enjoyable drawing experience as you learn how to draw a cupcake.The Anatomy of a Cupcake Drawing: Breaking It Down Understanding the basic components of a cupcake is crucial before you start drawing. A cupcake, at its core, consists of two main parts: the cup (or liner) and the cake (or muffin) itself, topped with frosting. Let's break down how to approach these elements step-by-step. This cupcake drawing lesson is designed to be super cute and easy to draw, perfect for anyone looking to create sweet art.
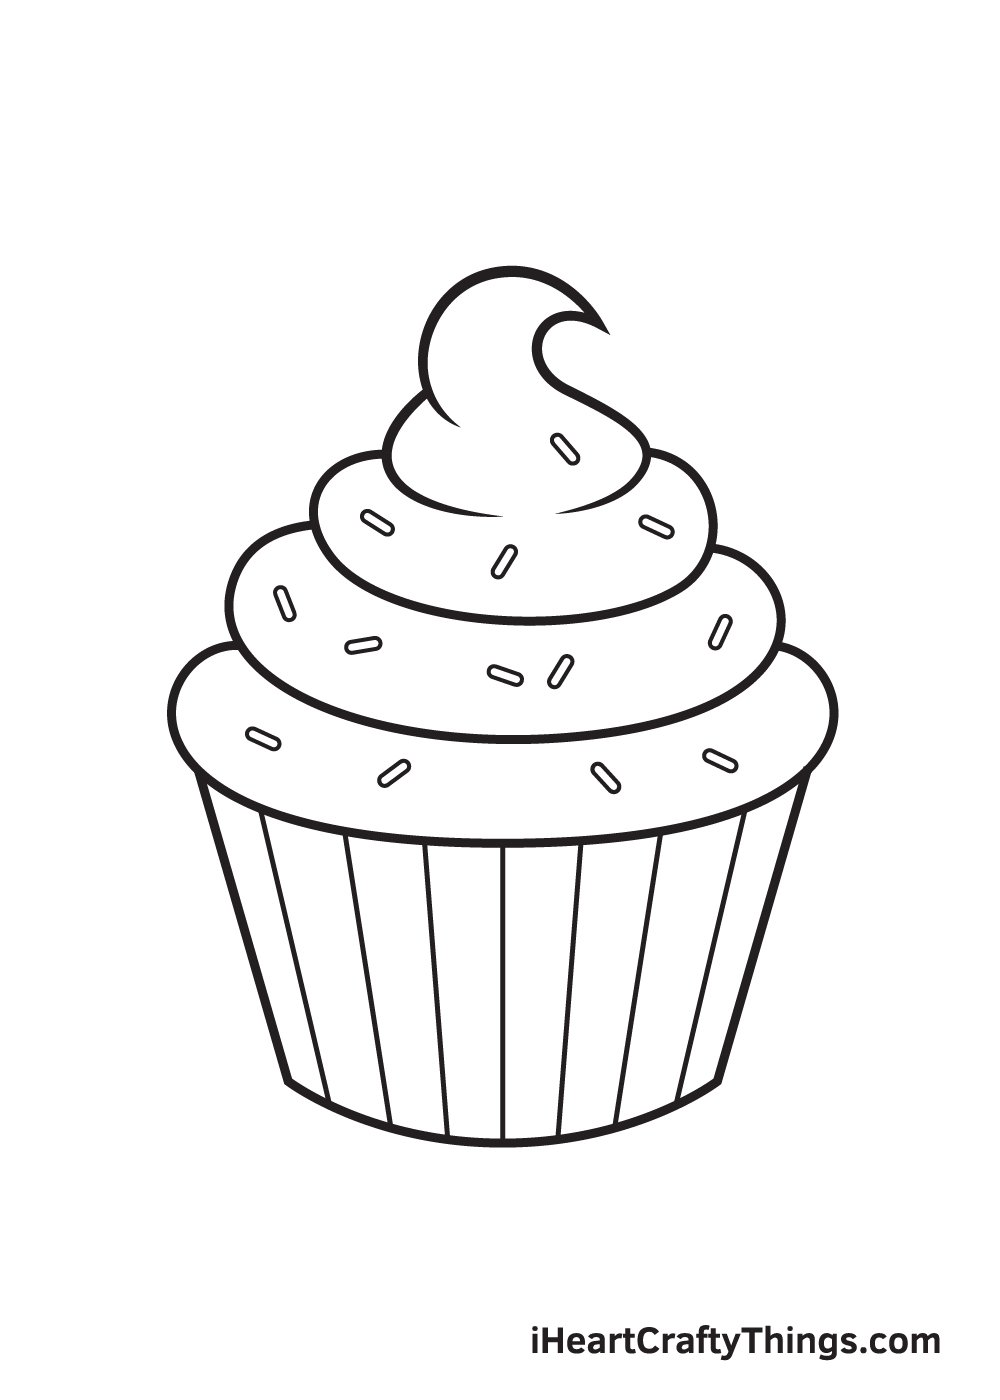
Starting with the Base: The Cup
The cup is the foundation of your cupcake drawing. It gives the dessert its characteristic shape and often features fluted details that add to its charm. * **Step 1: The Initial Shape.** Begin by drawing a simple U-shape or a slightly curved horizontal line for the bottom of the cup. This will be the base. * **Step 2: Adding the Sides.** From the ends of your base line, draw two slightly outward-sloping lines upwards to form the sides of the cup. * **Step 3: The Top Edge.** Connect the top of these two lines with another gentle curve, slightly wider than the base. This creates the opening of the cup. * **Step 4: Fluted Details.** To add the iconic fluted cup look, draw a series of vertical or slightly diagonal wavy lines along the sides of the cup, extending from the bottom to the top edge. These lines mimic the folds of the paper liner. The first, you draw a wavy line to form the cupcake, specifically its liner.Crafting the Muffin or Cake Top
The cake part of the cupcake often peeks out slightly from the cup, forming a rounded top before the frosting begins. * **Step 1: The Cake Dome.** Just above the top edge of your cup, draw a gentle, rounded dome shape. This should appear to be sitting snugly within the cup. It doesn't have to be perfectly symmetrical; a slight imperfection can add to its charm. * **Step 2: Connecting to the Cup.** Ensure the bottom of this dome shape seamlessly connects to the inner edges of your cupcake cup, giving the impression that the cake is baked inside. This step is about defining the transition from the liner to the baked good. By focusing on these foundational shapes, you're building a solid structure for your delicious cupcake drawing.Mastering the Frosting: Swirls and Drips
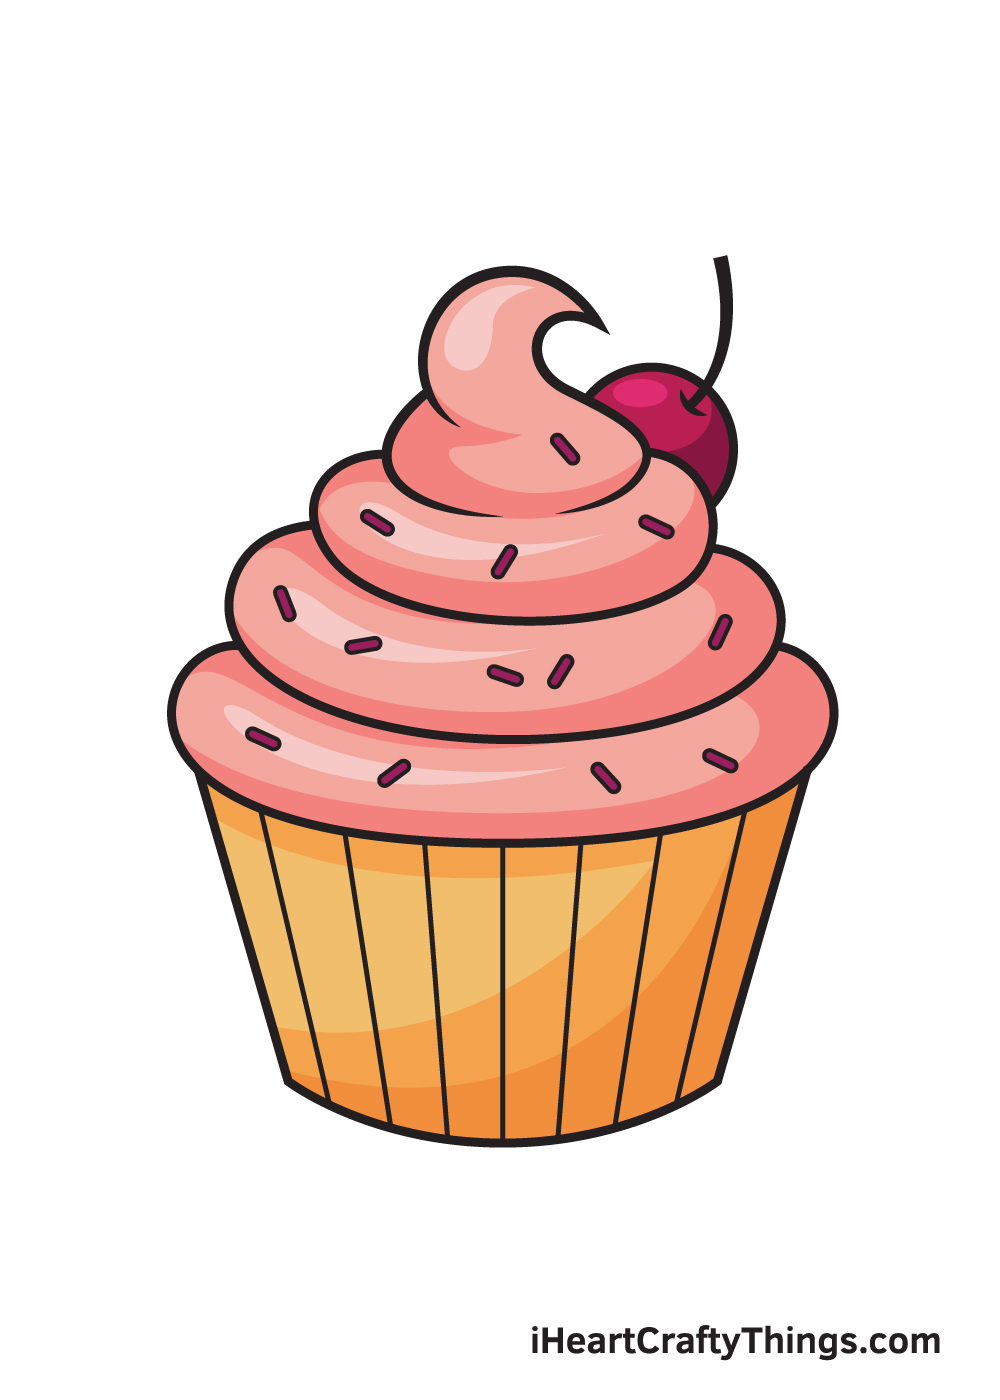
The frosting is arguably the most visually appealing part of a cupcake, offering endless opportunities for creative expression. It’s where you can truly make your cupcake drawing unique and tasty-looking. You can learn how to draw a cupcake with a fluted cup, a muffin, and a dripping icing, or a classic swirl.The Classic Swirl
The iconic frosting swirl is a hallmark of many cupcakes. Achieving it requires a series of overlapping curves. * **Step 1: The Base Swirl.** Start your cupcake with a horizontal line just above the cake dome. This will be the base of your cupcake’s frosting. From this line, begin drawing a large, soft "C" shape or a spiral that starts from the outside and moves inwards. * **Step 2: Adding Layers.** Now add the next swirl. Make it smaller in size than the previous one, stacking it on top and slightly inside the first swirl. Continue adding smaller, concentric swirls, gradually moving upwards and inwards, creating a delightful peak at the top. Think of it like soft peaks of whipped cream. * **Step 3: Defining the Edges.** Use light, wavy lines to suggest the soft, billowy texture of the frosting. Avoid perfectly smooth lines; a little irregularity adds to the realism.The Alluring Drip
A dripping icing effect adds a touch of decadence and realism to your cupcake drawing. * **Step 1: The Top Edge.** First, draw the main body of the frosting, perhaps a simpler dome or a single large swirl. * **Step 2: The Drips.** From the bottom edge of your frosting, draw small, irregular U-shapes or elongated teardrops that appear to be dripping down the sides of the cake. Some drips can be longer than others, and they don't need to be evenly spaced. * **Step 3: Pooling at the Base.** At the bottom of each drip, draw a small, slightly flattened curve where the "icing" would pool slightly before meeting the cupcake liner. This adds to the illusion of gravity and liquid. Learning to draw a tasty cupcake involves mastering these elements, making your artwork look good enough to eat!Adding the Details: Sprinkles, Strawberries, and Cherries
Once you have the main structure of your cupcake and its frosting, it's time to add the fun and flavorful details that make it truly irresistible. Find out how to draw cupcakes, frosting, sprinkles, strawberries, cherries and more, transforming your drawing into a visual feast.Playful Sprinkles
Sprinkles are perhaps the easiest and most effective way to add vibrancy and texture to your cupcake drawing. * **Step 1: Simple Shapes.** Draw tiny dots, short lines (for jimmies), or small circles (for nonpareils) scattered randomly over the frosting. * **Step 2: Varying Density.** Don't make them too uniform. Some areas can have more sprinkles than others, mimicking how they would naturally fall. * **Step 3: Color is Key.** When coloring, use a variety of bright hues to make your sprinkles pop and add a festive touch.Fruity Embellishments
Adding fruits like strawberries or cherries can elevate your cupcake drawing, giving it a gourmet touch. * **Strawberries:** * **Shape:** Draw a rounded, slightly irregular heart shape for the main body of the strawberry. * **Texture:** Add tiny dots or very small, shallow indentations to suggest the seeds. * **Stem:** At the top, draw a small green cap with a few pointed leaves. * **Cherries:** * **Shape:** Draw a perfect or slightly imperfect circle for the cherry. * **Highlight:** Add a small, curved highlight to one side to suggest its glossy surface. * **Stem:** Draw a thin, curved line extending from the top of the cherry, sometimes with a small leaf attached. These small additions bring character and realism to your sweet cupcake art.Coloring Your Tasty Treat: Bringing Life to Your Cupcake Drawing
Coloring is where your cupcake drawing truly comes alive, transforming simple lines into a mouth-watering visual experience. The choice of coloring medium – markers, crayons, or colored pencils – will significantly impact the final look and feel of your tasty treat. * **Markers:** For bold and vibrant results, markers are excellent. They provide strong, even color coverage. You can experiment with different shades for frosting to create depth, like a lighter pink for the main body and a slightly darker pink for shaded areas. Remember that markers can bleed, so practice on scrap paper first. * **Crayons:** Ideal for younger artists or for a softer, textured look. Crayons allow for easy blending by layering colors. You can press harder for darker shades or lighter for subtle tones. The waxy texture can also add a unique character to your cupcake drawing. * **Colored Pencils:** These offer the most control and versatility for shading, blending, and adding fine details. You can layer multiple colors to create rich, complex hues for your frosting, cake, and liner. For instance, use a light brown for the cake, then add darker brown strokes for texture. For the fluted cup, use a base color and then a slightly darker shade in the folds to create dimension. When coloring the frosting, use circular motions to mimic its soft texture, and add highlights with a lighter color or by leaving small white spaces. Don't forget to add vibrant colors to your sprinkles, strawberries, and cherries to make them pop. The right coloring technique can make your pastry sweets collection isolated on white background look incredibly appealing, almost like a real photograph.Creative Applications and Inspiration for Your Cupcake Art
Once you've mastered the basics of cupcake drawing, the possibilities for creative application are endless. This isn't just about drawing a single cupcake; it's about using the theme in so many creative ways. * **Personalized Cards:** Perfect drawing for Valentine's Day cards, Mother's Day, or any day you want to add a sweet, personal touch. A hand-drawn cupcake adds warmth and sincerity that store-bought cards can't match. * **Party Invitations:** Design unique invitations for birthdays or tea parties featuring your adorable cupcake drawings. * **Decorations:** Create cupcake-themed banners, placemats, or wall art for a kitchen or child's room. * **Storytelling:** Incorporate funny cupcakes into a comic strip or a children's storybook. Learn how to draw funny cupcakes! * **Digital Art:** If you're into digital drawing, use your newfound skills to create digital stickers, social media graphics, or even patterns for fabric or stationery. * **Trading Card Art:** As mentioned, these can be drawn on trading card size paper (2.5″ x 3.5″) and collected or traded, a fun way to share your art. For inspiration, see more ideas about cupcake drawing, drawings, and cupcake art online. Platforms like Pinterest, Instagram, and YouTube are brimming with examples. Look at different styles – from realistic to cartoonish, simple to highly detailed. You can find super cute and easy cupcake to draw tutorials that offer new perspectives and techniques. The goal is to draw and color this sweet cupcake step by step, cute and easy, making it your own.Fostering Creativity: The Benefits of Cupcake Drawing
Engaging in cupcake drawing is more than just a fun pastime; it offers numerous cognitive and emotional benefits, contributing to overall well-being and creative development. This seemingly simple activity aligns with principles of Expertise, Authoritativeness, and Trustworthiness by promoting valuable skills and positive habits. Firstly, drawing, in general, enhances **fine motor skills** and **hand-eye coordination**. For kids and beginners, the step-by-step process of drawing a cupcake – from forming the wavy line of the cup to adding the intricate swirls of frosting – provides excellent practice for developing precision and control. This foundational skill translates to many other areas of life, from writing to playing musical instruments. Secondly, it fosters **creativity and imagination**. While there are standard ways to draw a cupcake, the vast array of frosting styles, toppings, and colors allows for boundless personal expression. You can draw cupcakes with different flavors, unique decorations, or even give them funny faces. This encourages out-of-the-box thinking and the development of a unique artistic voice. When students learn how to draw a cupcake, they can go on to use the theme in so many creative ways, extending beyond just drawing to other crafts and ideas. Thirdly, drawing can be a highly **therapeutic and stress-reducing activity**. The focused concentration required for drawing helps to quiet the mind, offering a meditative escape from daily pressures. The satisfaction of creating something beautiful, even a simple cupcake, can boost self-esteem and provide a sense of accomplishment. It's a low-pressure way to engage with art, making it accessible to everyone. Finally, following a step-by-step drawing tutorial, like learning how to draw a cupcake in just 5 easy steps or a 20-minute how-to-draw-a-cupcake session, teaches **problem-solving and patience**. Each step builds upon the last, requiring careful observation and execution. If you follow my step-by-step drawing tutorial, you are going to be able to make your own cupcake, reinforcing the idea that complex tasks can be broken down into manageable parts. This systematic approach is a valuable life skill. Many resources, including free printable practice worksheets, are available to support this learning journey, providing structured guidance and encouraging consistent practice. Support the stream of your creative flow!Conclusion
We've journeyed through the delightful process of cupcake drawing, from understanding its sweet origins to mastering the art of the fluted cup, the cake dome, and those irresistible frosting swirls and drips. We've explored how simple tools can yield beautiful results and how adding details like sprinkles, strawberries, and cherries can truly bring your sweet treat to life. Coloring your cupcake drawing with markers, crayons, or pencils adds the final, vibrant touch, transforming your sketch into a delectable piece of art. Remember, the beauty of cupcake drawing lies in its accessibility and versatility. It's a perfect activity for kids and beginners alike, offering a fun and engaging way to develop artistic skills while fostering creativity and relaxation. Whether you're aiming to create personalized cards, unique party invitations, or simply enjoy a mindful artistic escape, the art of drawing cupcakes offers endless possibilities. Now it's your turn! Pick up your pencils, follow the simple steps, and let your imagination swirl. We'd love to see your sweet creations! Share your cupcake drawings in the comments below, or tell us about your favorite part of the drawing process. If you found this guide helpful, consider sharing it with fellow art enthusiasts, and explore other drawing tutorials on our site for more creative inspiration. Happy drawing!