The mesmerizing dance of flames, with their vibrant hues and unpredictable movements, has captivated humanity for millennia. Translating this ephemeral beauty onto paper through the art of fire drawing is a challenge many artists embrace, seeking to capture its dynamic essence and raw power. Whether you're a seasoned artist looking to expand your repertoire or a beginner eager to sketch your first flickering flame, understanding the fundamental principles behind depicting fire is key to creating truly stunning and realistic illustrations.
While real fires can be incredibly scary when out of control, contained fires are often seen as useful, comforting, and even charming. This duality makes fire a fascinating subject for artistic exploration. From the soft glow of a candle to the intense heat of a bonfire, each manifestation offers unique visual opportunities. This comprehensive guide will walk you through the essential steps and techniques to master fire drawing, ensuring your artistic endeavors burn brightly with creativity and precision.
Table of Contents
- The Allure of Fire Drawing
- Essential Tools for Your Fiery Creations
- Understanding the Dynamics of Flames
- Step-by-Step: Drawing Simple Flames
- Mastering Realistic Fire Drawing
- Exploring Different Fire Drawing Techniques
- The Journey of Practice and Patience
- Conclusion: Ignite Your Artistic Passion
The Allure of Fire Drawing
The captivating nature of fire, with its constant motion and vibrant colors, makes it a compelling subject for artists. Unlike static objects, fire is ever-changing, presenting a unique challenge to capture its transient beauty. When fires burn out of control, they can be very scary, invoking a sense of primal fear. Yet, contained fires, such as those in a fireplace or a campfire, are useful and even charming, offering warmth, light, and a focal point for gathering. This dichotomy provides a rich emotional landscape for artists to explore in their fire drawing endeavors. To truly excel in this art form, one must discover artistic techniques, color theory, and visual effects to create dynamic and realistic fire drawings. It's not just about replicating what you see; it's about understanding the underlying principles that govern fire's appearance and behavior. From the soft glow of embers to the aggressive reach of a wildfire, each type of flame demands a different approach and a keen eye for detail. This guide aims to demystify the process, showing that fire is not hard to draw once you grasp its fundamental characteristics.Essential Tools for Your Fiery Creations
Before you embark on your fire drawing journey, gathering the right supplies is crucial. Thankfully, you don't need an extensive array of specialized equipment. All you need to get started are essential drawing supplies like a pencil, eraser, a pen, and some paper. These basic tools are sufficient for sketching the initial forms and outlines of your flames. However, if you wish to delve deeper into the vibrant world of fire, incorporating color will elevate your artwork significantly. To color the fire, you can use any medium you like or have on hand. Markers can be a good option for brighter looking colors, providing intense saturation that mimics the brilliance of real flames. Colored pencils are another excellent choice, allowing for subtle layering and blending to achieve nuanced hues. For those aiming for a more painterly effect, watercolors or acrylics can also be used, though they require a different set of skills. The key is to experiment with different mediums to find what best suits your style and the effect you wish to achieve in your fire drawing.Understanding the Dynamics of Flames
Drawing flames and fire can be a little more complicated than drawing a series of cylinders, circles, and squares. This is because fire is not a solid object; it's a dynamic phenomenon. In this tutorial on how to draw fire, we will first break down the shape and flow of how a flame is formed. Understanding these foundational concepts is paramount to creating convincing and lively fire drawing.Basic Shapes and Forms
To get you started on the right track, here are the fundamentals of drawing flames, from the basic shapes and colors to halo effects and more. While fire appears chaotic, there are a few "basic" rules to keep in mind regarding its shape. A common starting point for a simple sketch of flames is to begin with your basic flame shape. You can draw a tear drop to help you get started if you need to. Think of it as one longer, and one shorter droplet. They should both be narrow and pointed at the top, and rounded and wider at the bottom. If you wanted a simple way to draw flames, you could just repeat this basic teardrop shape, varying its size and orientation. This foundational shape provides a solid base upon which to build more complex and realistic fire drawing.The Dance with Wind: Sporadic Oscillations
Beyond the basic teardrop, the true complexity of fire drawing comes from understanding its interaction with its environment. We will break down the concepts of how flames interact with the wind and therefore cause these sporadic oscillations within the structure of the flame drawing. Wind doesn't just push flames; it causes them to undulate, flicker, and sometimes split into smaller tendrils. This constant movement is what gives fire its living quality. Observing real fire, or looking at many different photographs of fires, is incredibly helpful. Try drawing different types of flames and look at many different photographs of fires so that you can get a better understanding of how fire looks in a still image. Notice how the tips of the flames often curl and twist, how the base remains relatively stable, and how smaller sparks might break away and float upwards. Capturing these subtle movements and variations is what transforms a static drawing into a vibrant representation of fire.Step-by-Step: Drawing Simple Flames
Ready to give it a shot? Then let's draw a fire! Learning how to draw fire, step by step, can be a very rewarding experience. This section will guide you through creating a simple illustration of fire in pencil, before going over it in pen and ink, building on the foundational shapes we just discussed.The Initial Sketch: Guidelines and Basic Forms
To start learning how to draw fire, begin by sketching a smooth, curved line on the left side. This will form the outer contour of the flame. The curve can be slightly irregular to mimic the natural movement of fire. Keep the shape flowing upward, as fire always rises. This initial line sets the direction and general height of your flame. If you want to draw simple flames, make yourself guidelines to help give the flames the right shape. A good technique is to draw a water droplet shape and add spikes on both sides. This gives you the basic, elongated, pointed form of a flame. These guidelines are not meant to be permanent; they are simply there to assist you in establishing the overall structure before you add details. They help ensure your flame has a natural, upward flow.Refining the Form: Flares and Peaks
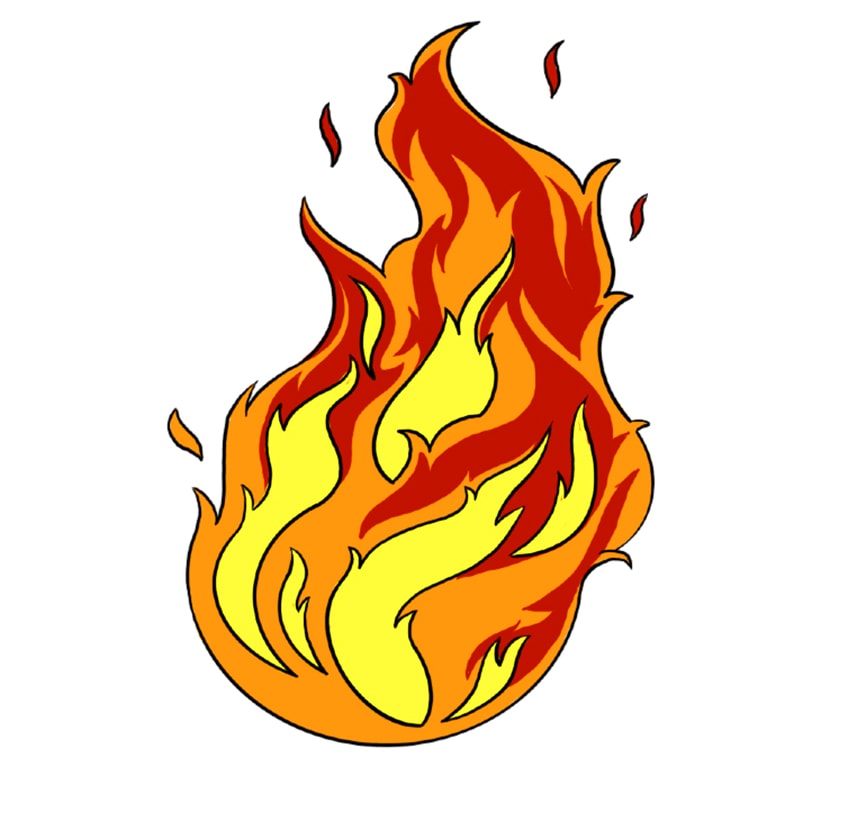
Once you have your initial outline, it's time to add the characteristic flickering elements. In the second step of this fire drawing tutorial, we will draw the first points of the flame’s flare. Each point of flare should dip outwards and then inwards while curving sharply towards the pointed part. These flares are what give fire its dynamic, almost liquid appearance. Underneath those lines, draw the peaks again 2 more times until you have 3 identical lines with a little space between each. This layering technique helps create the illusion of depth and movement within the flame, suggesting multiple layers of heat and light. Draw the tip of the fire, ensuring it comes to a sharp, ethereal point. Then, draw a smaller droplet shape inside the first one, and add even smaller droplets within the second fire. This creates a nested effect, mimicking how fire burns hottest at its core and cools as it expands outwards. This systematic approach to building up the flame's shape is crucial for a compelling fire drawing.Mastering Realistic Fire Drawing
Drawing flames requires patience and practice, as it involves capturing the elusive, transient nature of fire with accuracy, depth, and an understanding of its dynamic essence. It's not enough to just get the shape right; the true magic lies in rendering its luminosity and heat. Learn how to draw a realistic fire with this easy guide that shows you how to create flames, colors, and shading. Follow the simple steps and tips to make your fire drawing look stunning and mesmerizing.Adding Depth with Color and Shading
Color is arguably the most defining characteristic of fire. If you prefer to draw fire in color to represent its vibrant red, orange, and yellow hues, follow the steps below using colored pencils or markers. The key to realistic coloring is understanding the temperature gradient within a flame. Typically, the hottest part of the fire is the innermost core, which is usually depicted as yellow or even white. As the heat dissipates outwards, the colors transition. Make the outer part of the flame and the sparks red, the middle part orange, and the inner part yellow. This creates a natural progression of color that mimics how light and heat radiate from a flame. Shading plays an equally vital role. Even in a monochrome fire drawing, varying pressure with your pencil can create areas of light and shadow, giving the flame volume. For colored fire, use darker shades of red and orange for the cooler, outer edges, and brighter yellows and whites for the intense core. Consider how light from the fire would illuminate surrounding objects, adding a subtle glow to your overall composition. This attention to detail in both color and shading will bring your fire drawing to life, making it appear to flicker right off the page.Exploring Different Fire Drawing Techniques
The world of fire drawing is vast, offering numerous techniques to achieve different artistic effects. From stylized flames for a cartoon or comic book to highly realistic depictions for fine art, the approach can vary significantly. With this easy fire, flames, and fireballs drawing ideas, you can learn how to draw fire, flames, and fireballs in a very short time. These ideas often simplify the process, focusing on core shapes and color gradients to create immediate impact. One notable figure in the realm of artistic instruction is Goncalo Lopes, a professional artist coming from Portugal. The man behind this guide on fire drawing, Goncalo Lopes, brings a wealth of experience to teaching how to capture the dynamic essence of fire. His expertise underscores the value of learning from seasoned professionals who can break down complex subjects into manageable steps. For younger aspiring artists, resources like Kids Art Hub, a YouTube channel, provide animated drawing lessons designed for children of all ages. Our animated drawing lessons were designed for children of all ages. Kids Art Hub is a YouTube channel where your kids can find a lot of drawing tutorials and more, making learning accessible and fun. Regardless of your age or skill level, there are always new techniques to explore and refine in your fire drawing journey. You can also find and save ideas about fire drawing on Pinterest, a treasure trove of visual inspiration and step-by-step guides shared by a global community of artists.The Journey of Practice and Patience
As with any artistic endeavor, mastery in fire drawing comes with consistent practice and a good deal of patience. Drawing flames requires patience and practice, as it involves capturing the elusive, transient nature of fire with accuracy, depth, and an understanding of its dynamic essence. Don't be discouraged if your first few attempts don't look exactly as you envisioned. Each stroke, each color choice, and each attempt at capturing movement is a learning experience. The beauty of fire is its inherent unpredictability, and translating that onto a static medium like paper is a continuous challenge. Revisit the fundamentals often: understanding the shape of flames, how they react to air, and the interplay of light and shadow. Experiment with different angles, light sources, and types of flames – from a small matchstick flame to a roaring bonfire. The more you observe and practice, the more intuitive your fire drawing will become. Embrace the process, learn from your experiments, and allow your artistic voice to emerge through the captivating portrayal of fire.Conclusion: Ignite Your Artistic Passion
From the initial sketch of a smooth, curved line to the intricate layering of colors and flares, mastering fire drawing is a journey of observation, technique, and creative expression. We've explored the essential tools, understood the dynamic nature of flames, and walked through the steps to create both simple and realistic fire drawing. The guidance from professional artists like Goncalo Lopes and accessible resources like Kids Art Hub demonstrate that with the right approach, anyone can learn to depict this captivating element. Remember, the key to stunning and mesmerizing fire drawing lies in patience, continuous practice, and a willingness to experiment with artistic techniques, color theory, and visual effects. So, pick up your pencil, embrace the challenge, and let your artistic passion burn brightly. What kind of fire will you draw first? Share your thoughts and experiences in the comments below, or explore our other drawing tutorials to further ignite your creative spark!